Neo4j visualization tutorial – KeyLines
Getting started with KeyLines and Neo4j
Start a KeyLines trial
To follow this Neo4j visualization tutorial, you’ll need access to KeyLines.
Neo4j is a robust, scalable native graph database. It’s the most widely-used graph database in the world, with many years in production and millions of downloads. Its power and easy integration means it’s a popular back-end option for many KeyLines developers.
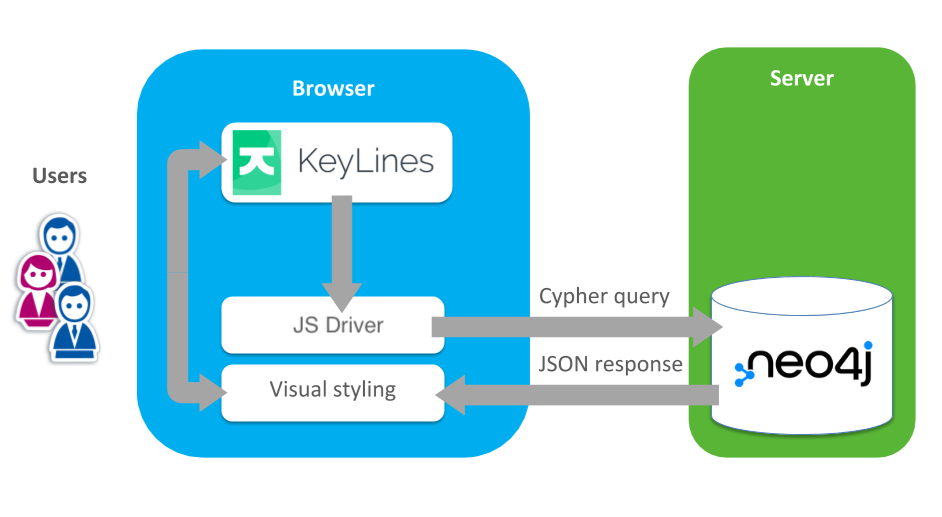
Visualization architecture
KeyLines itself is a JavaScript file that’s deployed to a web server. A chart element (powered by HTML5 Canvas or WebGL) is embedded into a web page for the user to access. Interactions with the chart raise events such as click, double-click and drag. You can then customize responses to these events to create the right user experience.
The architecture is clean, secure and fits any IT environment.
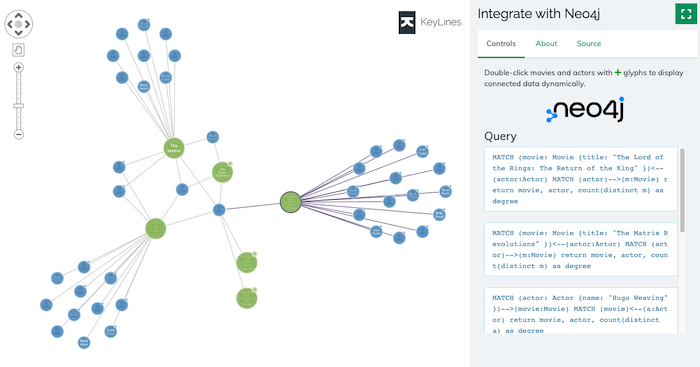
Integrate Neo4j & KeyLines
In this Neo4j visualization tutorial we’ll walk you through the steps to connect KeyLines to your Neo4j database.
If you’re not using KeyLines already, sign up for a free trial. You’ll also get access to the KeyLines SDK site featuring demos, code examples, a fully-documented API library and a live-coding playground.
Step 1: Connect Neo4j to KeyLines
The first step is to set up your Neo4j instance and connect it to KeyLines. Thanks to KeyLines’ Cypher integration, this is pretty simple.
Download the Neo4j Desktop application and follow the installation instructions.
Configure your username and password. You’ll need these to interact with the Neo4j JavaScript driver later.
Visit the KeyLines SDK site. On the Documentation tab, go to Third Party Integrations > Neo4j and download the Neo4j demo source files. To set up your demo databases, follow the instructions in the README.txt file.
Step 2: Create a connection between KeyLines and Neo4j
To allow KeyLines to talk to the graph, we’ll create a simple node.js Express Server. Our endpoint accepts cypher queries and returns JSON data.
Simply install the neo4j-driver node module, and then update the config details to match the username and password created in Step 1.
const neo4j = require('neo4j-driver');
const driver = neo4j.driver(
    configs.boltPath,
    neo4j.auth.basic(configs.username, configs.password),
    { disableLosslessIntegers: true },
);
Next we’ll set up an express handler. To respond to our queries, the handler submits Cypher queries to the Neo4j database using the Neo4j JavaScript Driver.
const queryTemplates = {
  actor: 'MATCH (actor: Actor {name: $nameParam })-->(movie:Movie) MATCH (movie)<--(a:Actor) return movie, actor, count(distinct a) as degree',
  movie: 'MATCH (movie: Movie {title: $nameParam })<--(actor:Actor) MATCH (actor)-->(m:Movie) return movie, actor, count(distinct m) as degree',
};
function setupEndpoint(app, // express app) {
  app.get('/neo4jdb/:queryType',
    async (req, res) => {
      const session = driver.session();
      res.on('finish', () => session.close());
      try {
        const response = await session.run(queryTemplates[req.params.queryType],
          { nameParam: req.query.name });
        let statement = response.summary.query.text.replace('$nameParam', `"${response.summary.query.parameters.nameParam}"`);
        statement = statement.replace('RETURN', '\nRETURN');
        console.info(`Neo4j statement: ${statement}`);
        res.send({ rawItems: response.records, statement });
      } catch (err) {
        console.error('Error connecting Neo4j', configs);
        res.send({ error: 'Error connecting Neo4j' });
      }
    });
}
Step 3: Send a query to Neo4j
Now we have a KeyLines chart, we need to raise AJAX Cypher queries to retrieve data from our Neo4j database. To make life easier, we’ll create a function that sends requests to our endpoint and handles the response:
function fetchData(queryType, querySearch) {
  const uri = getEndpoint(queryType, querySearch);

  let response;

  try {
    response = await fetch(uri, {
      method: 'GET',
      credentials: 'same-origin',
    });
  } catch (err) {
    console.log(err);
    throw Error(`Error while fetching ${queryType} "${querySearch}"`);
  }
  const content = await response.json();

  return {
    statement: content.statement,
    items: toKeyLinesFormat(content.rawItems, queryType, querySearch),
  };
}
Step 4: Convert to KeyLines JSON
Next we need to run a toKeyLinesFormat function that parses from Neo4j’s JSON format to KeyLines’ own format:
function toKeyLinesFormat(records, queryType) {
  const items = [];
  // Create the initial node and remove degree information
  const initialNode = records[0];
  const node = makeNode(initialNode._fields, initialNode._fieldLookup, queryType);
  node.d.degree = 0;
  items.push(node);
  // Loop through the rest of the results to produce nodes and links
  records.forEach((entry) => {
    const fields = entry._fields;
    const lookup = entry._fieldLookup;
    items.push(makeNode(fields, lookup, queryType === 'movie' ? 'actor' : 'movie'));
    items.push(makeLink(fields[lookup.actor].identity, fields[lookup.movie].identity));
  });

  return items;
}

function makeNode(fields, lookup, baseType) {
  const fieldRecords = fields[lookup[baseType]];
  const node = {
    id: fieldRecords.identity,
    type: 'node',
    t: baseType === 'movie' ? fieldRecords.properties.title : fieldRecords.properties.name,
    d: {
      degree: fields[lookup.degree],
      type: baseType,
    },
    tc: false,
  };
  return node;
}

function makeLink(id1, id2) {
  const link = {
    id: `${id1}-${id2}`,
    type: 'link',
    id1,
    id2 };
  return link;
}
Step 5: Load the graph in KeyLines
Finally, we load the data in our KeyLines chart:
chart.load({
 type: 'LinkChart',
 items,
});
That’s it! We have a KeyLines chart that can pull data from a Neo4j Graph database.
Next steps: Extend the UI
Every object type, function, event and option is documented in the KeyLines SDK’s API Reference library. Use this, together with the live-coding playground, to create customized tools that’ll help your users explore and understand the data in their own Neo4j databases.
Ready to get started with KeyLines?