
React is one of JavaScript’s most popular libraries. Developers love how its simplicity and scalability makes it faster to write and debug code.
One particularly powerful feature of React is Hooks. In this post, Matt from our development team shares one of the ways he uses Hooks to produce powerful, reusable functionality in ReGraph – our graph visualization toolkit for React.
Why use Hooks?
If you’re staying up-to-speed with the React release cycle then you’re most likely using Hooks. I’ve grown to like Hooks, especially as they reduce the boilerplate associated with class-based components.
Before React 16.8, there was no clear way to attach reusable, stateful behavior to a React component. I used to create higher-order components to manage the state and then pass down the stateful values (as props) to the children. But this felt like using a hammer to crack a nut, and it made my code harder to read.
Hooks in your graph visualization application
If you’re not familiar with the term ‘graph visualization’, it’s the name given to drawing a network diagram. It’s generally a load of nodes (or ‘vertices’) connected by links (or ‘edges’). This graph visualization shows employees at Enron, linked by the emails exchanged between them.
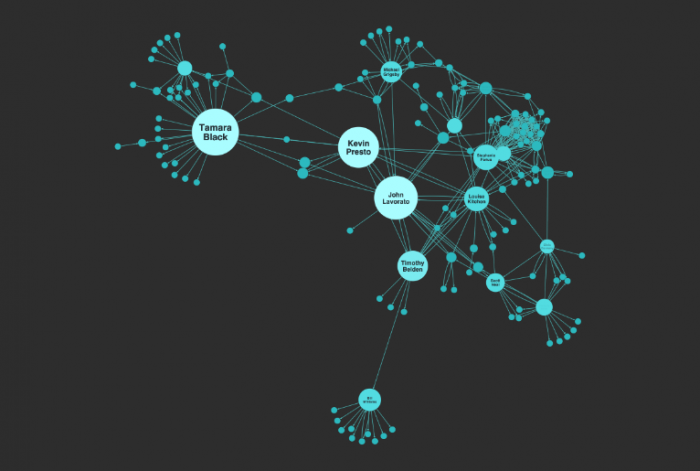
If you ask graph visualization app users to name the features that make exploring charts like these easier, many would say the ability to undo/redo chart interactions. This gives users the freedom to move nodes around and change other settings while they’re trying to reveal insight, patterns and trends, but return the graph to a previous state at any time.
Hooks are a great way to support undo/redo chart interactions. I’ll show you how to make one and connect it to a ReGraph chart.
Building an undo/redo feature with Hooks
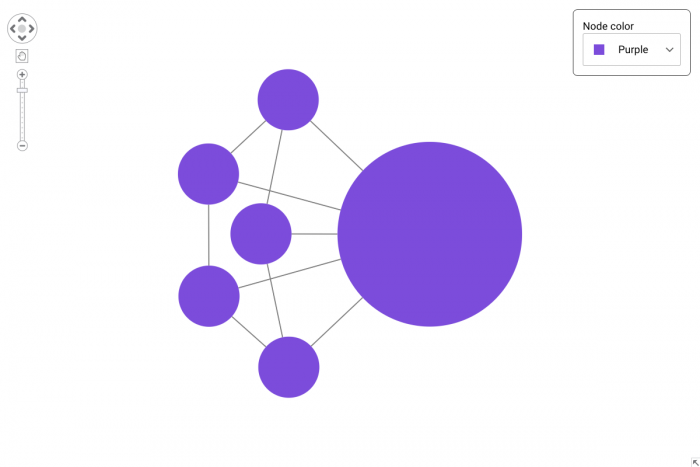
We’ll start off by creating a very simple app – just a chart with color picker for changing node colors:
// App.js

import React, { useState } from "react";
import { Chart } from "regraph";
import ColorPicker from "./ColorPicker";

import "./App.css";

const generateItems = ({ nodeColorHex }) => ({
  node1: { color: nodeColorHex, size: 3 },
  node2: { color: nodeColorHex },
  node3: { color: nodeColorHex },
  node4: { color: nodeColorHex },
  node5: { color: nodeColorHex },
  node6: { color: nodeColorHex },
  link1: { id1: "node1", id2: "node2" },
  link2: { id1: "node1", id2: "node3" },
  link3: { id1: "node1", id2: "node4" },
  link4: { id1: "node1", id2: "node5" },
  link5: { id1: "node1", id2: "node6" },
  link6: { id1: "node2", id2: "node3" },
  link7: { id1: "node3", id2: "node4" },
  link8: { id1: "node4", id2: "node5" },
  link9: { id1: "node5", id2: "node6" },
  link10: { id1: "node6", id2: "node2" }
});

const App = () => {
  const [nodeColor, setNodeColor] = useState({
    name: "purple",
    value: "#7D4CDB"
  });

  const items = generateItems({
    nodeColorHex: nodeColor.value
  });
  return (
    <div className="app">
      <Chart items={items} />
      <div className="app__settings-panel">
        <ColorPicker
          selected={nodeColor}
          label="Node color"
          onSelect={selectedColor => {
            setNodeColor(selectedColor);
          }}
        />
      </div>
    </div>
  );
};

export default App;
The majority of the code defines some data items to plot. We also save the nodeColor value using React’s useState Hook.
Now let’s say our users want an ‘Undo’ and a ‘Redo’ button for the color picker. We’d need to save a history of the nodeColor value, and also have functions that allow us to walk back, and forward, through the history.
This is implemented in our useHistory Hook:
// useHistory.js

import { useState } from "react";

const useHistory = initialState => {
  const [history, setHistory] = useState([initialState]);
  const [pointer, setPointer] = useState(0);

  const hasUndo = pointer !== 0;
  const hasRedo = pointer !== history.length - 1;

  const createVersion = newState => {
    const nextVersions = hasRedo ? history.slice(0, pointer + 1) : history;
    setHistory([...nextVersions, newState]);
    setPointer(nextVersions.length);
  };

  const undo = () => setPointer(Math.max(pointer - 1, 0));

  const redo = () => setPointer(Math.min(pointer + 1, history.length - 1));

  return [
    history[pointer],
    createVersion,
    {
      undo,
      redo,
      hasUndo,
      hasRedo
    }
  ];
};

export default useHistory;
The useHistory function is initialized with the initialState, and the function returns an array containing the current state, a setter, and an object containing the undo and redo functions. There are also boolean values telling us if there are any undos or redos remaining in the history stack.
The undo and redo functions simply adjust the pointer to reference a different location in the history array. The real core of the logic lies in the createVersion function. This is called whenever the user wants to update the state, e.g. to change the color in our application.
The function will create a new history array, with the supplied newState value as the last item in the array. If the hasRedo flag is true, i.e. the user has used undo at least once and is now changing the state, we instead discard the future items in the history array before adding the newState value.
Here’s the updated App.js code which now uses this Hook to manage the node color. We’ve also added undo and redo buttons.
// App.js

import React from "react";
import { Chart } from "regraph";
import ColorPicker from "./ColorPicker";
import useHistory from "./useHistory";

import "./App.css";

const generateItems = ({ nodeColorHex }) => ({
  node1: { color: nodeColorHex, size: 3 },
  node2: { color: nodeColorHex },
  node3: { color: nodeColorHex },
  node4: { color: nodeColorHex },
  node5: { color: nodeColorHex },
  node6: { color: nodeColorHex },
  link1: { id1: "node1", id2: "node2" },
  link2: { id1: "node1", id2: "node3" },
  link3: { id1: "node1", id2: "node4" },
  link4: { id1: "node1", id2: "node5" },
  link5: { id1: "node1", id2: "node6" },
  link6: { id1: "node2", id2: "node3" },
  link7: { id1: "node3", id2: "node4" },
  link8: { id1: "node4", id2: "node5" },
  link9: { id1: "node5", id2: "node6" },
  link10: { id1: "node6", id2: "node2" }
});

const App = () => {
  const [nodeColor, setNodeColor, nodeColorHistory] = useHistory({
    name: "purple",
    value: "#7D4CDB"
  });

  const items = generateItems({
    nodeColorHex: nodeColor.value
  });
  return (
    <div className="app">
      <Chart items={items} />
      <div className="app__settings-panel">
        <div className="app__settings-panel__buttons">
          <button
            onClick={e => {
              e.preventDefault();
              nodeColorHistory.undo();
            }}
            disabled={!nodeColorHistory.hasUndo}
          >
            ← Undo
          </button>
          <button
            onClick={e => {
              e.preventDefault();
              nodeColorHistory.redo();
            }}
            disabled={!nodeColorHistory.hasRedo}
          >
            Redo →
          </button>
        </div>
        <ColorPicker
          selected={nodeColor}
          label="Node color"
          onSelect={selectedColor => {
            setNodeColor(selectedColor);
          }}
        />
      </div>
    </div>
  );
};

export default App;
Rather than using React’s useState Hook to manage the node color, we’re now using our custom Hook: useHistory.
We’ve kept the nodeColor and setnodeColor variables, which we use just as we did before, the nodeColorHistory object lets us call undo() and redo(). You can see this in the onClick methods in the buttons we’ve added.
Also, notice that we can use the hasRedo and hasUndo properties to set the disabled state on the buttons.
That’s it – we have our undo/redo feature.
Reusing Hooks in your application
The really nice thing about this Hook is that we can easily reuse it in other places, saving you coding time and effort. If we want to add undo functionality for the positions of nodes, it’s really simple.
First, we’d create variables to manage node positions:
const [positions, setPositions, positionHistory] = useHistory(null);
Then we’d listen to the onChartChange event from ReGraph, to update positions. We also need to pass positions to the chart:
  const handleChartChange = ({ positions }) => {
    if (positions) {
      setPositions(positions);
    }
  };
…
<Chart
  items={items}
  positions={positions}
  onChartChange={handleChartChange}
/>
Here’s the complete code:
// App.js

import React from "react";
import { Chart } from "regraph";
import ColorPicker from "./ColorPicker";
import useHistory from "./useHistory";

import "./App.css";

const generateItems = ({ nodeColorHex }) => ({
  node1: { color: nodeColorHex, size: 3 },
  node2: { color: nodeColorHex },
  node3: { color: nodeColorHex },
  node4: { color: nodeColorHex },
  node5: { color: nodeColorHex },
  node6: { color: nodeColorHex },
  link1: { id1: "node1", id2: "node2" },
  link2: { id1: "node1", id2: "node3" },
  link3: { id1: "node1", id2: "node4" },
  link4: { id1: "node1", id2: "node5" },
  link5: { id1: "node1", id2: "node6" },
  link6: { id1: "node2", id2: "node3" },
  link7: { id1: "node3", id2: "node4" },
  link8: { id1: "node4", id2: "node5" },
  link9: { id1: "node5", id2: "node6" },
  link10: { id1: "node6", id2: "node2" }
});

const App = () => {
  const [nodeColor, setNodeColor, nodeColorHistory] = useHistory({
    name: "purple",
    value: "#7D4CDB"
  });

  const [positions, setPositions, positionHistory] = useHistory(null);

  const handleChartChange = ({ positions }) => {
    if (positions) {
      setPositions(positions);
    }
  };

  const items = generateItems({
    nodeColorHex: nodeColor.value
  });

  return (
    <div className="app">
      <Chart
        items={items}
        positions={positions}
        onChartChange={handleChartChange}
      />
      <div className="app__chart-buttons">
        <button
          onClick={e => {
            e.preventDefault();
            positionHistory.undo();
          }}
          disabled={!positionHistory.hasUndo}
        >
          ← Undo
        </button>
        <button
          onClick={e => {
            e.preventDefault();
            positionHistory.redo();
          }}
          disabled={!positionHistory.hasRedo}
        >
          Redo →
        </button>
      </div>

      <div className="app__settings-panel">
        <div className="app__settings-panel__buttons">
          <button
            onClick={e => {
              e.preventDefault();
              nodeColorHistory.undo();
            }}
            disabled={!nodeColorHistory.hasUndo}
          >
            ← Undo
          </button>
          <button
            onClick={e => {
              e.preventDefault();
              nodeColorHistory.redo();
            }}
            disabled={!nodeColorHistory.hasRedo}
          >
            Redo →
          </button>
        </div>
        <ColorPicker
          selected={nodeColor}
          label="Node color"
          onSelect={selectedColor => {
            setNodeColor(selectedColor);
          }}
        />
      </div>
    </div>
  );
};

export default App;
As you can see, the Hook also works for this example. We can independently use the undo functionality on the node color, because that’s on a different history stack.
For more information about Hooks, check out the React docs. You can also find some handy Hook collections here:
Ready to try it for yourself?
ReGraph makes it easy, fast and enjoyable to build powerful graph visualization applications using React. If you want more details, check out our ReGraph white paper available together with many other useful, downloadable resources.
If you’d like to see the toolkit for yourself, request a free trial of ReGraph.
Thanks to Ash (@juice49), the creator of this code sandbox under MIT License*, which was the inspiration (and code) behind our useHistory Hook.
MIT License details
Permission is hereby granted, free of charge, to any person obtaining a copy of this software and associated documentation files (the “Software”), to deal in the Software without restriction, including without limitation the rights to use, copy, modify, merge, publish, distribute, sublicense, and/or sell copies of the Software, and to permit persons to whom the Software is furnished to do so, subject to the following conditions:
The above copyright notice and this permission notice shall be included in all copies or substantial portions of the Software.
THE SOFTWARE IS PROVIDED “AS IS”, WITHOUT WARRANTY OF ANY KIND, EXPRESS OR IMPLIED, INCLUDING BUT NOT LIMITED TO THE WARRANTIES OF MERCHANTABILITY, FITNESS FOR A PARTICULAR PURPOSE AND NONINFRINGEMENT. IN NO EVENT SHALL THE AUTHORS OR COPYRIGHT HOLDERS BE LIABLE FOR ANY CLAIM, DAMAGES OR OTHER LIABILITY, WHETHER IN AN ACTION OF CONTRACT, TORT OR OTHERWISE, ARISING FROM, OUT OF OR IN CONNECTION WITH THE SOFTWARE OR THE USE OR OTHER DEALINGS IN THE SOFTWARE.
Share: