By the end of this tutorial, you’ll have built an AWS Neptune visualization tool using KeyLines, our graph visualization toolkit for JavaScript developers.
Back in 2017, Amazon launched Amazon Neptune, a hosted graph database service with an engine optimized for storing billions of relationships and querying the graph with milliseconds of latency. This service lets developers focus more on their applications and less on database management.
What’s special about Neptune is that it supports different open standards for describing and querying data:
- Gremlin – a graph traversal language from Apache TinkerPop
- Resource Description Framework (RDF) queried with SPARQL, a declarative language based on Semantic Web standards from W3C
- openCypher – a declarative query language for property graphs originally developed by Neo4j
We’re big fans of these approaches here at Cambridge Intelligence, and KeyLines can work with all of them. For this article, we’ll use SPARQL. (Prefer Gremlin? see our KeyLines & Amazon Neptune tutorial.)
To follow this tutorial, you’ll need a KeyLines account
Here’s the application architecture we’ll create:

Step 1: Launch Amazon Neptune
Launching the Amazon Neptune database was pretty straightforward, thanks to the Amazon Neptune getting started guide.
Once it’s launched, you can configure database options (parameter group, port, cluster name, etc).
Step 2: Load data
Next, we need to load data into the Neptune database, and again, the official documentation is our friend. For a successful load your data files have to be in one of the following formats:
- N -Triples (ntriples) format
- N-Quads (nquads) format
- RDF/XML (rdfxml) format
- Turtle (turtle) format
Whichever input format you choose, Neptune will allow you to use the SPARQL endpoint at /sparql endpoint.
For this tutorial, we’ll use a movies dataset representing films and the actors in them in turtle format (.ttl). Here’s what it looks like:
@prefix imdb:http://www.imdb.com/>.
@prefix dbo: <http://dbpedia.org/ontology/>.
@prefix mo: <http://www.movieontology.org/2009/10/01/movieontology.owl#>.

<http://imdb.com/movie/Avatar> a mo:Movie;
    imdb:hasTitle "Avatar";
    mo:hasActor <http://imdb.com/actor/Sam_Worthington>;
    imdb:imageUrl "http://cf1.imgobject.com/posters/374/4bd29ddd017a3c63e8000374/avatar-mid.jpg".
<http://imdb.com/actor/Sam_Worthington> a dbo:Actor;
  imdb:hasName "Sam Worthington".
<http://imdb.com/movie/Pirates_of_the_Caribbean:_The_Curse_of_the_Black_Pearl> a mo:Movie;
    imdb:hasTitle "Pirates of the Caribbean: The Curse of the Black Pearl";
    mo:hasActor <http://imdb.com/actor/Zoe_Saldana>;
    imdb:imageUrl "http://cf1.imgobject.com/posters/242/4bc9018b017a3c57fe000242/pirates-of-the-caribbean-the-curse-of-the-black-pearl-mid.jpg".
<http://imdb.com/actor/Zoe_Saldana> a dbo:Actor;
  imdb:hasName "Zoe Saldana".
<http://imdb.com/movie/Avatar> a mo:Movie;
    imdb:hasTitle "Avatar";
    mo:hasActor <http://imdb.com/actor/Zoe_Saldana>;
    imdb:imageUrl "http://cf1.imgobject.com/posters/374/4bd29ddd017a3c63e8000374/avatar-mid.jpg".
[...]
Step 3: Configure access to the Amazon Neptune dataset
Amazon Neptune provides an HTTP REST endpoint to connect to a Neptune DB instance. The HTTP endpoint for SPARQL queries is:
https://your-neptune-endpoint:port/sparqlTo reach the database HTTP REST endpoint, Amazon needs the request to originate from an Amazon EC2 instance in the same virtual private cloud (VPC).
One way to achieve this is by querying our loaded Amazon Neptune instance using a couple of other AWS technologies:
- AWS Lambda – there’s no need to build a separate server or handle requests with this gateway proxy integration service. It connects directly to Amazon Neptune, making database queries quick and easy.
- Amazon API Gateway – this offers the easiest way to expose the AWS Lambda function to our application.
To get started quickly with a Lambda function, use the AWS CloudFormation Lambda templates for Neptune. Remember to launch the stack in your correct AWS region. We’ll use the NodeJS runtime and specify the appropriate Neptune cluster endpoint and port number for our deployment.
Now we can write our Lambda function. Here’s a sample function to get us started. We’ll use the axios npm module to keep the actual data fetching code nice and clean.
const axios = require('axios');

function getQuery(param) {
  return `SELECT  ?actor ?name ?title
    WHERE
    { <${param}>
      mo:hasActor    ?actor ;
      imdb:hasTitle  ?title .
      ?actor    imdb:hasName   ?name .
      ?movie    mo:hasActor    ?actor
    }
   GROUP BY ?actor ?name ?title`;
}

const getData = (url, query) => {
  return axios
    .get(`${url}?query=${query}`)
    .then(response => (response.data.results ? response.data.results : 'No results returned.'))
    .catch(error => {
      return `Error calling endpoint: ${error}`;
    });
};

exports.handler = function(event, context, callback) {
  const endpoint = `https://${process.env.NEPTUNE_CLUSTER_ENDPOINT}:${process.env.NEPTUNE_PORT}/sparql`;

  const coreResponse = {
    statusCode: 200,
    headers: {
      'Access-Control-Allow-Methods': 'OPTIONS, POST, GET',
      'Access-Control-Max-Age': 2592000, // 30 days
      'Access-Control-Allow-Headers': '*',
      'Content-Type': 'application/json'
    }
  };
  const queryParam = event.pathParameters && event.pathParameters.param;
  getData(endpoint, getQuery(queryParam)).then(result => {
    callback(null, { ...coreResponse, result });
  });
};
Notice the helpful getQuery function in this snippet: this is where we write our core SPARQL query that’ll be passed a search parameter via our API.
Finally, we need to expose our KeyLines application to the code that talks to Amazon Neptune. For this we’ll use the Amazon API Gateway.
There’s (you guessed it) detailed AWS documentation to get you started with the Amazon API Gateway. Once you’ve configured the right security levels, we can construct a REST endpoint that invokes our AWS Lambda function on demand.
Get started with our toolkit technology
Not tried KeyLines yet?
Step 4: Query our new REST endpoint
We can now use our fresh Application Gateway API to service requests in our local KeyLines application.
The great thing about the modern JavaScript ecosystem and brilliant open source libraries like Axios is that we can use the same libraries in our front-end client code.
import axios from 'axios';

const PARAM = 'query string goes here';
const URL = `https://3e2qaizna0.execute-api.us-east-1.amazonaws.com/query/${PARAM}`;

const getResponse = async () => {
  try {
    const res = await axios.get(URL);
    return res.data;
  } catch (e) {
    console.error(e);
  }
};
It’s that simple. All that’s left to do now is to parse the data into KeyLines format.
Step 5: Format the data
In our case, we just need to format the JSON data returned from our SPARQL queries into a KeyLines JSON object that details nodes and links.
This toKeyLinesFormat function creates a JSON object of nodes and links that KeyLines understands:
function makeNode(id, label) {
  const node = {
    type: 'node',
    id,
    label
  };
  return node;
}
function makeLink(id1, id2) {
  const link = {
    id: `${id1}-${id2}`,
    type: 'link',
    id1,
    id2
  };
  return link;
}
const toKeyLinesFormat = results => {
  let output = [];
  results.forEach(({ actor, title, name }) => {
    output.push(makeNode(actor.value, name.value));
    output.push(makeNode(movie.value, title.value));
    output.push(makeLink(movie.value, actor.value));
  });
  return output;
};

const items =  toKeyLinesFormat(result);
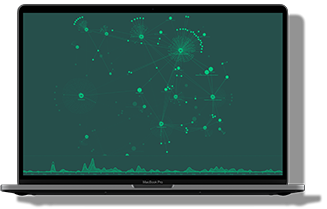
Step 6: View your AWS Neptune visualization
We’ll load our data into the KeyLines chart now. Neptune will return our nodes and links with the toKeyLinesFormat() function, which we can easily load into KeyLines using:
chart.load({ type: 'LinkChart', items });
That’s it! We have a simple working prototype of a graph visualization tool, running on an Amazon Neptune back-end.
What next?
Your chart might look fairly basic right now, but it’s easy to get your KeyLines app looking good. You can customize almost every aspect of your chart so it matches both your company style and the needs of your users.
Need some inspiration? We have plenty of demos on the KeyLines SDK, including one for integrating with Amazon Neptune. Go ahead and request a free trial.
FREE: Start your KeyLines trial today
Visualize your data! Request full access to our KeyLines SDK, demos and live-coding playground.
This tutorial was originally published some time ago and described how to integrate KeyLines with an early preview version of Amazon Neptune. It’s still popular, so we’ve rewritten it to include the latest AWS technologies.


